Automation with Salt (SaltStack)
Apr 18, 2024
Salt - also known as SaltStack - is an orchestration tool used for automated configuration management and simultaneous task execution on remote machines.
While salt-ssh is included in recent versions for agentless operation, Salt typically makes use of agents (minions) installed on configured managed systems, which are controlled from a central command server (master)
This guide walks through the steps that are required to establish communication between a master and multiple minions in an agent-based architecture, and provides instructions on how to perform tasks remotely using grains, modules and states.
Further information can be found at docs.saltproject.io.
In order to better demonstrate the capabilities of Salt, typically, a setup with more than one minion machine is required. For the purposes of this guide, I will be working with a two machines running CentOS Stream 9, and one machine running Ubuntu 22.04. One of the CentOS machines will serve as the master, from which commands will be passed to the minions, while the other CentOS machine and the Ubuntu machine will be our minions. I will be running all three systems as virtual machines (VMs) in VirtualBox on bridged network mode. This setup can be achieved using physical machines and different Linux distributions as well (some instructions such as package manager commands may be different), so feel free to do so. What is important is that all three machines have different IP and MAC addresses, and are on the same network. Cloned VMs will not work.
Initial Requirements
To begin, we need to download disk images for CentOS Stream and Ubuntu. We can then create the three virtual machines we need by clicking "New" and following the setup instructions in VirtualBox, and install the operating systems by going through with the graphical installation inside the VMs. These processes are fairly straightforward and the default settings are most likely fine, but feel free to customize as you see fit.

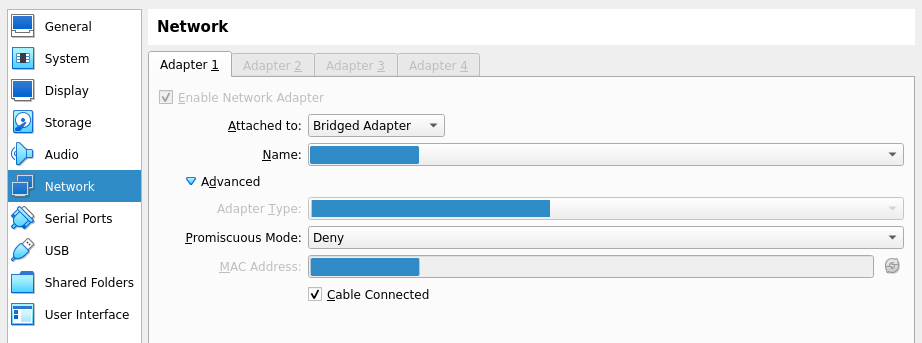
Next, we need to configure bridged mode for all the network interfaces. The default setting uses NAT (network address translation), which puts every VM on its own separate network. Bridged mode will allow the VM to work with our network interface using the device driver on the host machine, assign it an IP address on the same network using DHCP, and filter packets accordingly. Therefore, all of our VMs will be on the same network, of which our host machine is also a part. After going to "Settings", we can configure bridged mode in the "Network" tab shown below. For all three VMs, we need to select the "Bridged adapter" setting and choose our regular network interface (which is a wireless interface in my case).
Installing Salt
To proceed, Salt needs to be installed. The project website has instructions for installation using the bootstrap script. Installation needs to be done on all three VMs.
Download the bootstrap script:
Make the script executable:
For the CentOS minion, simply run the script:
For the Ubuntu minion, run with the -P option to install needed packages through pip:
For the master, run with the -M option to install master services as well:
Setting up the Salt Communication
In order to set up the connection between the master and the minions, we need to use the IP of our CentOS master machine, which can be obtained by running ifconfig.
I will assume that the IP address is 192.168.100.100. We need to bind this address as the interface in the master configuration file.
Find the interface line, uncomment if necessary, and add the master IP address.
interface: 192.168.100.100
Restart the master service to apply the change.
Next, for both minions, we need to go into the minion configuration file, find the master line, uncomment if necessary, add the same master IP address, and then restart the minion service for the changes to take effect.
master: 192.168.100.100
The minions now know the master, but the master does not know the minions. This is because Salt communications are initiated by minions, and this eliminates the need to open ports or alter SELinux configurations on the minions, minimizing the attack surface. Minions will send their keys to the master address in the configuration file (which they should already have after the changes above). We can list the incoming keys with salt-key.
To accept all keys, run the command below.
The connection should now be established. We can confirm this by pinging the minions from the master using Salt.
Salt Grains
Salt uses the grains interface for obtaining information about the underlying system running a minion service. This is crucial, since we might want to execute different commands depending on what kind of system we are working with. Grains can provide information about the operating system, kernel, network, cpu, memory and many other properties of the system. In fact, we can simply return the operating system families of our minions by running the following command on the master.
This is useful, as we can now selectively run commands on systems, using Salt's -G option for grains, while managing everything from the master.
For example, we can run the yum command - which is the package manager for Red Hat systems - on relevant minions only, without causing errors and unnecessary load on other machines.
In our case, salt should run yum on CentOS only, and make no changes on Ubuntu.
The command below will install the epel-release package for CentOS, which configures the "Extra Packages for Enterprise Linux" repository.
For a full list all grains and their data, we can run the following command.
Execution Modules
Execution modules in Salt are functions that are called by the salt command to perform certain tasks.
In fact, we have already used a module: grains is technically an execution module which is used to interact with grains data.
We can make use of other modules following a similar syntax.
Here is one way to obtain minion IP addresses using the network module.
This next example makes use of the file module and its file_exists method to check if the .bashrc file for the root account exists on our systems.
If true, we could modify the file to add a setting of our own for the next time we log in to the system directly, using the append method of the same module.
Next, leveraging grain data, we can check if the epel-release package was installed successfully.
|
In fact, the pkg module above is a virtual module.
Virtual modules can be used to provide a convenient standard interface for tasks handled by different programs on different systems.
For example, we can install the package nginx on both minions with a single command.
In this case, pkg will internally use apt for Ubuntu, and yum for CentOS.
Salt has built-in modules which can be used to perform a variety of tasks on target machines. A full list of these modules and their usage instructions can be found on the official documentation pages.
State Files
Execution modules are typically used for executing immediate tasks or gathering information, but in order to define desired states and perform a large number of changes to systems, we need to make use of state files.
State files in Salt have the .sls extension (Structured Layered State), and are written in the YAML format, with the addition of jinja2 templating.
By default, they are stored in the /srv/salt directory.
States also make use of modules, but state modules and execution modules are not the same. The official documentation has separate pages for state modules, which can be referred to when working with Salt states.
We can create a simple state file to install git on both minions using the pkg state module.
git:
  pkg.installed
To apply a state for all minions, we need to run the following command, giving it the name of our state file without the extension:
We can extend the file to install both git and nginx, and make it look more neat.
packages:
  pkg.installed:
    - pkgs:
      - git
      - nginx
This time, when we apply the state file, nothing will be installed. This is because both packages are already installed on the minions. Most modules in Salt work in a smart way which ensures that the system is in the desired state. In this case, Salt will install the desired packages if they are not present on the system, and simply verify without making changes if they already exist. This reduces overhead, as Salt will not attempt to make changes if the target system is already in the desired state. It also prevents certain errors which might result from overwriting files or changing existing configurations.
We can also work with the file module in state files, which comes in handy when deploying and managing configuration changes.
To demonstrate, this time we will source a file directly from the master.
We start by making a new directory and creating an exemplary file on our master machine.
To deliver this file to the /etc directory on both of our minions, we can apply the following state.
example_file:
  file.managed:
    - name: /etc/hello
    - source: salt://files/hello
salt:// prefix tells Salt to look for the file in the /srv/salt directory on the master system by default.
This is not the only option; in fact, we can source remote files using http:// or ftp:// using the exact same syntax.
Here is another state which we can append to our mystate.sls file.
This one will ensure that the group morgan with the group ID of 1944 exists, and the user morgan with the user ID of 1944, home directory of /home/morgan, default shell of /bin/bash and password of captain is also present on the system.
morgan:
  group.present:
    - gid: 1944
  user.present:
    - gid: 1944
    - uid: 1944
    - home: /home/morgan
    - shell: /bin/bash
    - password: captain
    - hash_password: True
Pillar Data
In the example above, declaring the password in the state file is not ideal.
This is a good time to introduce pillars in Salt.
Pillars are data structures which allow confidential data to be delivered only to relevant minions in a secure way.
Pillar data stored on the master needs to be made available to the desired minions in the /srv/pillar/top.sls file.
Pillar files also have the .sls extension, and are stored in /srv/pillar by default.
To proceed, first we need to provide some data - in this case a password which we will use later - in a pillar file.
We write the following line into the file.
password: black
Next, we need to make the pillar data available to minions.
For demonstration purposes, we will make the "secret" pillar available for the CentOS minion only, and create a new user there while doing nothing for Ubuntu.
Again, we can achieve this by using grains.
Here is the top.sls file for this configuration.
base:
  'os_family:RedHat':
    - match: grain
    - secret
In order to work with this in a state file, we can to make use of conditional statements provided by jinja2.
We go back to our mystate.sls file.
We add the following lines to the file and apply the state.
kraken:
group.present:
- gid: 2010
user.present:
- gid: 2010
- uid: 2010
- home: /home/kraken
- shell: /bin/sh
- password:
- hash_password: True
This will create the kraken group with the group ID of 2010, and the kraken user with the user ID of 2010, home directory of /home/kraken, default shell of /bin/sh and password of black, which will be obtained from the pillar file.
Salt Requisites
You might remember that the hello file that we created and delivered to the minions was actually addressed to the kraken user.
However, we delivered the file to the /etc directory on both minions, including the one which does not have the user kraken.
A wiser choice would be to put the file to the user's home directory, on the relevant machine.
One way to achieve this would be to use the requisites system to make sure that the user is present before attempting to place a file in her home directory.
This would not only prevent errors on all irrelevant minions, but it would also make sure that the user and the directory are present before the file operation by creating dependencies between states, thereby eliminating the risk of failure due to an inconsistent order of execution.
With these considerations in mind, we can rewrite the state in the following way.
example_file:
  file.managed:
    - name: /home/kraken/hello
    - source: salt://files/hello
    - require:
      - user: kraken
There are multiple requisite directives in Salt, and require is only one of them.
In the final section, we will use require as well as watch - a requisite type which allows us to trigger certain actions when certain changes occur.
Setting up a Working Web Server
As a final example, we will configure and start a Web server on the Ubuntu minion, using some of the modules we have seen so far, and a couple of new concepts.
First, we need a working nginx.conf file.
Below is a very minimal configuration.
user www-data;
worker_processes auto;

events {
}

http {
  server {
    listen 80 default_server;
    root /var/www/hello;
    index index.html;
    location / {
    }
  }
}
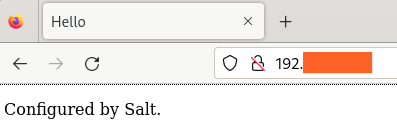
Next, we need a basic index.html file.
Hello
Configured by Salt.
Finally, we put everything together in a Salt state file. The state file below does the following:
- Ensure that our custom Web root directory (
/var/www/hello) exists. - Source the
index.htmlfile from the master. - Install
nginx. - Source the
nginx.conffile from the master (requirenginxinstallation). - Enable the
nginxservice (requirenginxinstallation). - Reload the service every time the configuration changes.
web_root:
file.directory:
- name: /var/www/hello
- makedir: True
web_index:
file.managed:
- name: /var/www/hello/index.html
- source: salt://files/index.html
- require:
- file: web_root
web_server:
pkg.installed:
- name: nginx
file.managed:
- name: /etc/nginx/nginx.conf
- source: salt://files/nginx.conf
- require:
- pkg: nginx
service.running:
- name: nginx
- enable: True
- reload: True
- watch:
- file: /etc/nginx/nginx.conf
- require:
- pkg: nginx
We should now have a working Web server on our Ubuntu machine, accessible on port 80!